How to Create a Successful Wedding Seating Chart for 2026


Why the Seating Chart Is Harder Than It Looks
The wedding seating chart is the planning task most likely to make a couple cry in the final two weeks before the wedding. The reason is not the logistics — those are mechanical — but the social calculation. Every decision about who sits with whom carries family politics, friend-group dynamics, divorce navigation, and judgment calls about which strangers will get along over a three-hour dinner.
The good news is that the chart only has to work for the dinner block — typically 60 to 90 minutes. After dinner, guests move freely. Get the dinner seating right and the rest of the night handles itself. The framework below is what experienced wedding planners use to build seating charts efficiently, with fewer rounds of revision and fewer hurt feelings.
Step 1: Decide on Table Shapes Before You Assign Anyone
Table shape determines how many guests sit per table and how the conversation flows. Get this decision right before you start placing guests.
- Round tables (8 to 10 guests): the default for most weddings. Best for mixed-acquaintance groups; the round shape lets everyone see and hear each other.
- Long rectangular tables (8 to 14 guests per table, often joined into king's tables): create more intimate conversation between immediate neighbors but make cross-table conversation harder. Best for tight friend groups.
- Mixed configuration (round tables for family, long tables for friend groups): the most flexible setup, popular in 2026, but requires more linen rental coordination.
- Sweetheart table (just the couple) vs head table (couple plus wedding party): sweetheart table is the more common choice in 2026 because it lets the wedding party sit with their own dates rather than displacing them.
Confirm chair count per table with the venue — round tables can technically seat 10 but feel cramped at 10 and comfortable at 8.
Step 2: Group by Relationship First, Refine by Personality Second
Start by grouping guests into broad categories based on their relationship to the couple. The standard groupings:
- Immediate family (your siblings, your parents' siblings, grandparents)
- Extended family (cousins, family friends who are like family)
- College or childhood friends of the bride
- College or childhood friends of the groom
- Work colleagues
- Friends of the family (parents' friends)
- Neighbors or community connections
Once grouped, sort each category into table-sized clusters. Most categories will divide naturally into 1 to 3 tables. The work of personalizing seating happens within each cluster — who from the college friends should sit at which table, who from the extended family pairs well together. The cluster-first approach prevents the analysis paralysis that comes from trying to place every guest individually from scratch.
Step 3: Handle the Difficult Cases First
Every wedding has a handful of guests whose seating requires careful thought. Address these before you finalize easy placements:
- Divorced parents: place them at separate tables of equal proximity to the head table or sweetheart table. Acknowledge family politics; do not pretend they do not exist.
- Estranged family members: confirm with the relevant party how they want to handle this. Sometimes table separation is enough; sometimes you need to seat them in opposite corners of the room.
- Single guests without a clear group: the worst seating fate is being placed at a "singles table" of strangers. Better: place each single guest at a table where they know at least one other person.
- Guests with mobility issues: place them at tables with clear access paths to the bathroom and the bar, away from the dance floor edge.
- Guests with severe dietary restrictions: do not isolate them — place them at tables with friends, but coordinate with the caterer to ensure their meal is the right one.
Step 4: Place Tables Strategically in the Room
Once the per-table guest lists are set, decide where each table goes in the venue. Three rules:
- Closest to the head table or sweetheart table: immediate family. Parents in particular should be within easy speaking distance of the couple.
- Next ring out: extended family and the closest friend groups.
- Outer ring: friends-of-family, neighbors, work colleagues, and other guests with looser ties to the couple.
- Avoid: placing any table directly next to the speakers or DJ booth (those guests will struggle to hear each other through dinner) or directly in front of the buffet line if there is one (constant traffic).
Use the venue's room layout to plan visually. A floor plan diagram with sticky notes for each table is the lowest-tech and often most-effective tool — easier to rearrange than digital tools when you discover late changes.
Step 5: Use Tools That Reduce the Pain
Several digital tools have meaningfully improved seating-chart workflows in 2026. The strongest:
- AllSeated and Prismm: professional event-planning tools with venue-specific floor plans and guest-management features. Free tier handles most wedding sizes.
- WeddingWire's seating chart tool: integrated with the WeddingWire RSVP system, simple drag-and-drop interface.
- A spreadsheet: still surprisingly effective. Columns for guest, table number, dietary restriction, plus-one status, RSVP status. Filter by table to verify each one looks right.
Whichever tool you use, build the chart as a working document — version it, share with your partner and key stakeholders for review, and expect 3 to 6 rounds of revision before it locks. Final seating should be confirmed 7 to 10 days before the wedding.
Common Pitfalls to Avoid
Mistakes that consistently cause problems on the wedding day:
- Trying to be perfectly fair to both sides — small imbalances are inevitable, and trying to engineer perfect symmetry creates worse outcomes than accepting some asymmetry.
- Seating high-energy and quiet guests together hoping they will balance — they will not; the high-energy guest dominates and the quiet guest disengages.
- Putting plus-ones at separate tables from the people who invited them — guarantees an awkward dinner for the plus-one.
- Assigning people to tables but not to seats at the table — large tables benefit from named seats so couples can sit together and so awkward strangers do not end up next to each other.
- Telling family members where they will be seated before the chart is locked — every premature reveal triggers requests for changes.
- Putting your wedding party at one big table away from their dates — the wedding party often wants to sit with their own dates and friends, not as a separate unit.
Day-Of Logistics
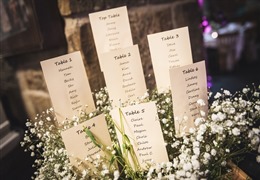
Once the chart is locked, communicate it three ways: a printed escort-card display at the reception entrance, a master seating list given to the day-of coordinator and the venue manager, and individual place cards at each seat (recommended for larger tables) or just at the head table.
Plan for last-minute changes on the day. There will always be a no-show or two, a guest who needs to swap tables for a discreet reason, or a plus-one who arrives unexpectedly. Build flexibility into the chart — leave one or two empty seats per side of the room rather than packing every table to capacity. The empty seats give your coordinator room to make adjustments without disrupting other guests.